Alocasia Leaves Turning Yellow: Causes and Fixes
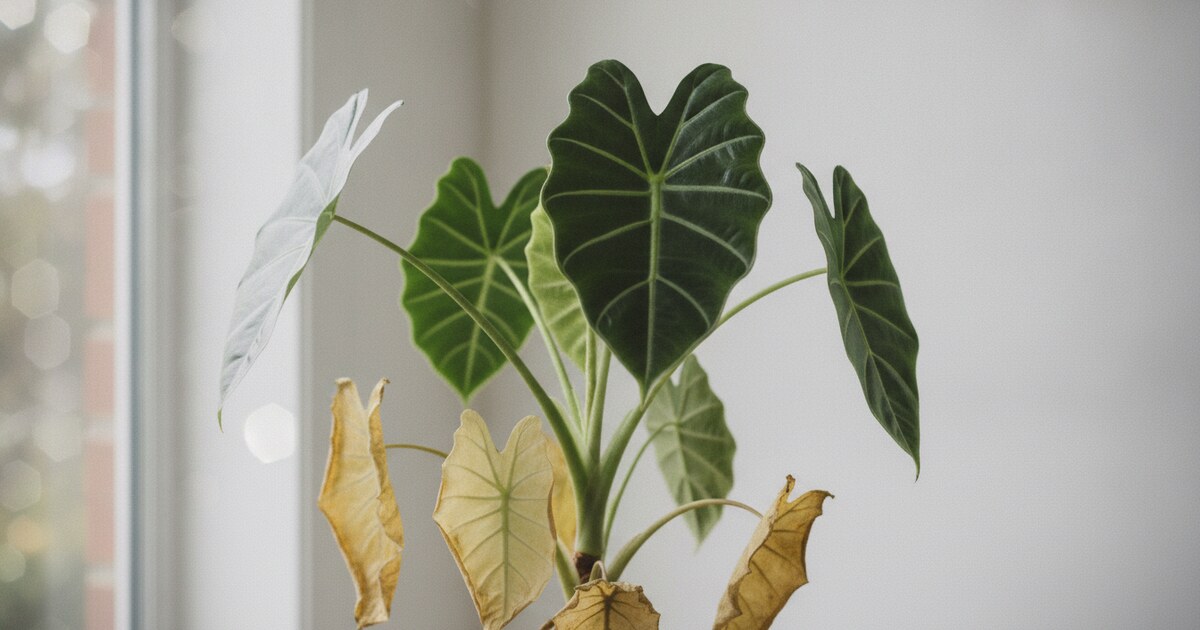
Your alocasia looked healthy last week, and now a leaf has shifted from deep green to pale yellow. You haven’t changed the watering schedule, the spot is the same, and there’s no obvious damage. So what’s going on?
Alocasia leaves turning yellow is one of the most confusing symptoms in houseplant care because the same visual result has at least seven different causes. Overwatering, low humidity, bad lighting, nutrient deficiency, spider mites, natural dormancy, and temperature stress all produce yellow leaves; each one calls for a completely different fix. Treating overwatering stress the same way you’d treat drought stress makes things worse.
This guide shows you how to read the pattern and match it to the right cause.
Alocasia leaves turn yellow most often from overwatering, low humidity, or insufficient light. Soggy soil staying wet for more than a week points to overwatering. Crispy leaf margins with dry soil point to humidity stress. Pale, even yellowing across whole leaves without crispy edges usually means not enough indirect light.
What Yellow Alocasia Leaves Are Telling You
Start by looking at which leaves are yellowing and how the color spreads. Lower, older leaves yellowing while the rest of the plant stays green is usually normal leaf cycling: alocasia regularly drops older foliage to redirect energy to new growth. Yellowing that spreads through young, mid-canopy, or upper leaves means something else is wrong.
Alocasia (elephant ear, African mask) evolved in humid tropical forests across Southeast Asia, including the Philippines, Malaysia, Borneo, and Indonesia. In its natural habitat it grows at 70–90% relative humidity, in temperatures between 65 and 85°F (18–29°C), under bright filtered light at 2,000–4,000 lux. Standard US homes run at 30–50% humidity, and forced-air heating drops that below 25% near vents in winter. Alocasia roots require a partially dry-wet cycle: the top 2–3 cm of soil should dry between waterings. Sustained root saturation triggers Pythium root rot within 48–72 hours in warm soil. Spider mites thrive at humidity below 40% and temperatures above 75°F (24°C), often appearing alongside low-humidity yellowing. The plant’s corm (underground storage bulb) remains viable through full dormancy even when every aboveground leaf has died.
The location pattern cuts through uncertainty fast: base yellowing with wet soil means overwatering; edge yellowing with dry soil means humidity or temperature stress; overall pale yellowing across whole leaves means a light problem; yellow patches between green veins means nutrient deficiency; stippled texture with fine webbing means spider mites.
Overwatering and Root Rot
Overwatering is the most common reason alocasia leaves turn yellow. The pattern is clear: yellowing starts on the oldest, lowest leaves and works upward. Leaves feel soft and limp rather than crispy.
The soil stays wet for 7 days or more, and there’s sometimes a sour smell from the pot.
The roots are the real problem. When soil stays waterlogged, roots lose access to oxygen and Pythium root rot sets in within 48–72 hours. The leaves show symptoms a week or two after the roots are already damaged, which is why overwatering often looks sudden even though the problem built up slowly.
To fix it:
- Stop watering immediately and move the plant to bright indirect light to help the soil dry faster.
- Slide the plant out of its pot. Healthy roots are firm and white or tan. Rotten roots are brown or black, soft, and smell musty.
- Trim away rotten roots with clean scissors. Let the cut ends dry for 20 minutes.
- Repot into fresh mix: 60% potting soil, 30% perlite, 10% orchid bark works well for alocasia.
- Water next only when the top 2–3 cm of soil feels dry.
If the corm is soft or discolored in spots, cut back any affected sections and treat the remaining firm tissue with a 3% hydrogen peroxide dip (20 minutes) before repotting.
Our guide to overwatered vs underwatered plants covers the side-by-side soil and leaf texture checks if you’re still not sure which one you’re dealing with.
Low Humidity and Temperature Stress
Alocasia needs 60–80% relative humidity. Most homes, especially in winter, run well below that. When humidity drops under 50%, yellowing starts at the leaf margins: the edges pale first, then turn brown and curl inward.
Forced-air heating in winter is often the trigger. The same vent that keeps your home warm strips moisture from the air and from the plant’s leaves at the same time.
Fixes that work:
- A small humidifier placed 1–3 feet from the plant is the most reliable option.
- Grouping plants together raises local humidity slightly as they release moisture from their leaves.
- A pebble tray (a shallow dish filled with pebbles and water, with the pot sitting above the waterline) adds passive moisture as the water evaporates.
Misting doesn’t help long-term and can invite fungal spots if the leaves stay wet overnight.
Cold temperature is closely related. Alocasia drops leaves fast when exposed to temperatures below 60°F (15°C), especially near drafty windows, exterior doors, or AC vents. If your home regularly drops below that in winter, the plant will respond with yellowing even if humidity is fine.
Lighting Problems
Alocasia yellow leaves from bad light look different depending on the direction of the problem.
Too little light produces an even, overall fade from deep green to pale yellow-green across whole leaves. Growth slows or stops. New leaves come in smaller than usual.
The plant isn’t getting the 4–6 hours of bright indirect light it needs per day. Moving it closer to an east-facing or west-facing window usually reverses this over 3–4 weeks.
Too much direct sun bleaches leaves instead of yellowing them evenly. Irregular pale yellow or white patches appear where sunlight hit hardest, often with a papery texture at the edges.
Direct afternoon sun through a south-facing window is the usual culprit. Moving the plant back a few feet or adding a sheer curtain solves it.
The sweet spot: 3–6 feet from a bright window, with no direct sun on the leaves for more than 1–2 hours in the early morning.
Nutrient Deficiency in Alocasia
Nutrient deficiency is less common than the causes above, but it shows up in plants that have been in the same soil for over a year without fertilizing.
Nitrogen deficiency yellows leaves uniformly, starting with the oldest at the base and slowly working upward. The whole plant looks pale and tired. Growth stalls.
Magnesium deficiency looks different: yellow patches appear between the veins, while the veins stay green. This pattern (called interveinal chlorosis) shows up mid-canopy or higher and is easy to confuse with pest damage until you rule out webbing.
To fix nitrogen deficiency, apply a balanced liquid fertilizer (10-10-10 or 20-20-20) at half strength every 2 weeks from spring through early autumn. Skip fertilizing in autumn and winter.
To fix magnesium deficiency, dissolve 1 teaspoon of Epsom salt in 1 quart of water, drench the soil, and repeat once 3 weeks later. One or two applications is usually enough.
Don’t fertilize a plant that’s stressed from root rot or a recent repot. Wait until new growth appears before feeding.
Natural Dormancy and Normal Leaf Cycling
Not all yellow alocasia leaves signal a problem.
Alocasia cycles through leaves as it grows. Older leaves at the base gradually yellow, the petiole softens, and the leaf drops. The plant pushes new growth from the center at the same time. One or two lower leaves cycling out per month is normal, especially from late summer through autumn.
In autumn and early winter, alocasia can also enter dormancy. Shorter days and cooler temperatures trigger it.
Leaves yellow and drop faster during dormancy, and new growth stops entirely. The underground corm stays alive even if every aboveground leaf disappears.
If dormancy is happening:
- Move the plant to a warmer spot (65°F/18°C or above) with the best available indirect light.
- Water very sparingly: once every 3–4 weeks, just enough to keep the corm from desiccating.
- Wait for spring. New growth typically returns once daylight hours push past 10–12 hours per day.
The tell between dormancy and a real problem: dormancy yellowing starts at the base with healthy new growth present elsewhere. Stress yellowing spreads through multiple leaf generations at once.
Pests Causing Alocasia Leaves to Turn Yellow
Spider mites are the most common pest that yellows alocasia, and they often arrive alongside low-humidity conditions. Dry air stresses the plant and gives mites the conditions they need to reproduce fast.
Check the undersides of leaves for fine webbing and tiny moving dots. The upper leaf surface shows stippled, slightly bronzed patches where mites have punctured individual cells to feed.
To get rid of spider mites:
- Isolate the plant immediately to prevent spread to nearby plants.
- Wipe every leaf surface, top and bottom, with a damp cloth to remove mites and webbing.
- Spray with neem oil solution: 2 tsp neem oil and 1 tsp dish soap per quart of water, shaken well, applied to all leaf surfaces.
- Repeat every 5–7 days for 3 weeks to catch newly hatched eggs.
- Raise humidity above 60% around the plant. Mites can’t reproduce effectively in high humidity.
The same treatment protocol works across tropical aroids. Our guide to spider mites on monstera has the full spray schedule and follow-up checks, and the approach translates directly to alocasia.
Mealybugs and scale also appear occasionally. Mealybugs leave white cottony deposits at stem joints and leaf undersides.
Scale appears as hard brown bumps along stems. Both drain sap and cause yellowing. Treat with the neem oil solution or remove manually with a cotton swab dipped in rubbing alcohol.
How PlantlyAI Can Help
When you’re staring at a yellow leaf and still can’t pin down the cause, a photo diagnosis cuts through the uncertainty.
PlantlyAI identifies plant problems from a single photo. Snap a picture of the affected leaves and the app tells you the most likely cause, then walks you through a step-by-step treatment plan with organic, biological, or chemical options. You get 2 free diagnoses per day with no account required.
Frequently Asked Questions
Why are my alocasia leaves turning yellow and falling off?
Yellow leaves that drop are usually from overwatering or dormancy. If the soil has been staying wet for more than a week, scale back watering and check the roots for rot. If only older lower leaves are dropping while new growth looks healthy, the plant is cycling leaves normally or entering seasonal dormancy.
Can yellow alocasia leaves turn green again?
No. Once a leaf is yellow, the chlorophyll loss is permanent. Remove the yellowed leaf at the base to redirect the plant’s energy to new growth. Watch for new leaves pushing from the center; those come in green once the underlying problem is corrected.
How often should I water my alocasia?
Water when the top 2–3 cm (about 1 inch) of soil feels dry. In most homes that’s every 7–10 days in summer and every 14–21 days in winter. Exact frequency varies by pot size, soil mix, and light levels. Check the soil before watering rather than following a fixed schedule.
Why are my alocasia leaves turning yellow in winter?
Winter stacks several problems at once: shorter days reduce light, forced-air heating drops humidity, and cooler temperatures slow root function. Many alocasia varieties also drop a few lower leaves entering dormancy. Improve humidity with a humidifier or pebble tray, move the plant closer to the brightest window available, and reduce watering frequency.
Should I cut off yellow alocasia leaves?
Yes, once a leaf is at least 75% yellow. Cut it cleanly at the base with sterilized scissors. Removing dying leaves stops the plant from wasting energy on tissue it can’t recover. Wait until the leaf is mostly yellow before cutting; removing partially yellow leaves too early adds unnecessary stress.
If the pattern still doesn’t point to a single clear cause, a photo diagnosis makes it fast. PlantlyAI identifies exactly what’s wrong from one photo and gives you a step-by-step treatment plan with organic, biological, or chemical options. Start with 2 free scans per day, no account needed. Get PlantlyAI on iOS or download for Android.
Not sure what's wrong? Diagnose your plant free
Upload a photo to our free plant disease identifier and get an instant diagnosis.